Do you want to help, but you're not sure how? Here are suggestions to get you started, and some great ideas of projects you can do over the summer.
Use these shortcuts to go directly to a specific section:
• Quilt Patterns • Stuffed Animal Patterns • Wheelchair Bags • Preemie Caps • Drawstring Bags • Pillowcases
• Organizations We Support • Other Charitable Opportunities •
Suggested Quilt Sizes (Approximate)
- Preemie Quilts — 16" x 24" quilted by hand or machine and washed in Ivory or Dreft. Absolutely NO tied quilts, no buttons, no pompoms.
- Crib Size — 36" x 36" – no larger than 45" x 45"
- Nursing Home (Wheelchair) — 36" x 36" No larger, please, as we do not want our beautiful quilts to get caught in the wheels.
- Summer Camp-minimum 60" wide, 80" long.
- Blankies, for pedriatic patients: 42" x 42" or larger, for ages newborn to 21 years.
- NICU Isolet Covers: 30" x 36" in light colored fabrics. Must be quilted, not tied.
Files in .pdf format require Adobe Acrobat Reader — a free program from Adobe. If you do not have Adobe Acrobat Reader, you can download it by clicking the Adobe Reader icon: ![]()
Easy Assembly Suggestions — Option A
Thank you to member Marge Geary for these easy assembly instructions:
On a large flat surface, layer (top to bottom): Batting, Top Fabric (right side down), Bottom Fabric (right side up). The right sides of your top and bottom fabric will be together. Sew around the border of three sides, and 3/4 of the way around the fourth side. Leave an opening and turn the quilt inside out. Your top layer will be in place, with the batting in the middle and the bottom layer on the bottom — just where they all belong! You are now ready to quilt or tie!
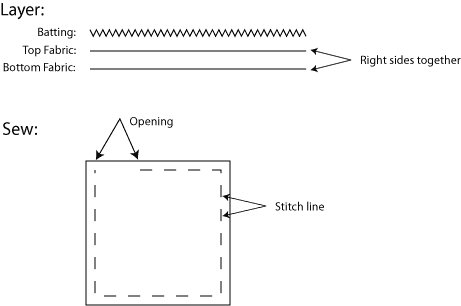
›› Print These Instructions (PDF Format) ‹‹.
Easy Assembly Suggestions — Option B
This is another way to finish off quilts rather than doing the pillow turn method or making separate binding and sewing on. This works up very fast for charity quilts.
This should be done with a machine with walking/even feed foot.
The top and batting should be the same size with the backing about 3" larger.
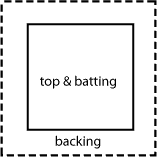 Lay the backing face down with the top and batting centered on it, face up.
Quilt as desired.
Trim the backing to 1" all around.
Turn the backing in ½" to meet the top/batting.
Turn in again ½ to cover the edge of the top/batting.
Sew down on machine.
›› Print These Instructions (PDF format) ‹‹
Sample Quilt Patterns
Charity Quilt Pattern #1
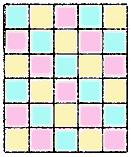
Finishd block size is 7" and there are 30 blocks total, five rows of six each. Each row is the same, with rows 2 & 4 upside down.
 Start with a 6" square of a print fabric – 30 needed.
Cut 30 2" x 6" pieces of assorted solid or small prints.
Cut 30 2" x 7½" pieces of assorted solid or small prints.
Sew the smaller 2"x 6" border to the squares. PRESS to border.
Sew the 2"x 7½" to the square. PRESS to border.
Sew in rows of six alternating the side border right then left, border always on bottom. There are five rows. PRESS.
Sew rows together. PRESS.
To assemble, lay batting down smooth, lay backing on top, face up. Put top face down and pin baste around edges. Sew ¼" from edge of top all around leaving a 6" opening. Turn right side out and quilt by machine or tie. Close opening.
›› Print These Instructions (PDF format) ‹‹
Charity Quilt — Giant Log Cabin
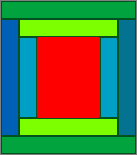 Start with a panel or large focal print measuring between 16"-22" x 22"-26" or two smaller panels with sashing in between.
You will want your finished quilt between 36-40" wide and 40-44" long. If your panel is 16"x24" you will need 10" each side to make 36" x 44"
36" – 16 = 20" / 2 = 10" ![]() 44" – 24" = 20" / 2 = 10"
44" – 24" = 20" / 2 = 10"
This 10" border for each side can be two 5" borders or three 3-4" borders. All strips can be different or same, 1 long or pieced.
This is like a giant log cabin block with the center the focal fabric.
If you have a serger, this is a good place to use it, as ¼" seam allowances do not have to be accurate.
Sew strips to each side, then top and bottom. Repeat. When finished, PRESS. It is just nine or 13 pieces and very fast.
To assemble, lay batting down smooth, lay backing on top, face up. Put top face down and pin baste around edgges. Sew ¼" from edge of top all around leaving a 6" opening. Turn right side out and quilt by machine or tie. Close opening.
›› Print These Instructions (in PDF Format) ‹‹.
Rag Quilt
These instructions are compliments of Elaine Jansen of Sewright in Bayside.
Thank you, Elaine!
 SUPPLIES:
- Sewing Machine
- Walking Foot
- Machine quilting needle size 90
- Thread: 40wt. Cotton (Mettler / YLI var.)
- Rotary cutter / ruler / mat
- Batting: cotton or thin poly
- Scissor (Fiskars softouch micro-tip recommended)
FABRICS: Yarn dyed woven cottons or cotton flannels work best (homespun, flannel, madras). WASH or NOT? If there is any question of color running — WASH!
YARDAGE:
- Baby Quilt: 30" x 36" (5 x 6); 30 pair (60 total) 7" squares = 3 yards
- Lap Quilt: 42" x 54" (7 x 9); 63 pair (126 total) 7" squares = 5½ yards
To calculate the amount of different fabrics needed, divide the total yardage by the number of fabrics — i.e. baby quilt: 3 divided 6 = ½ yard of 6 different fabrics.
BATTING:
- Baby: cut 30 6" squares
- Lap: cut 63 6" squares
 INSTRUCTIONS:
- Cut fabric into 7" squares
- Cut batting into 6" squares
- Sandwich batting between fabric
- Sew an "X" from corner to corner. This completes the block.
- Sew blocks together using a zig-zag stitch and a ½" seam, to desired size.
- When size is reached, in place of a binding, sew a zig-zag stitch ½" from raw edge around the entire quilt.
- Snip raw edges on seams and border 1/8" to ¼" apart.
- Take the completed quilt to the laundromat and wash and dry. It may take two washings to completely the edges to your sasisfaction.
›› Print These Instructions (in PDF Forma) ‹‹.
Easy Lee's Quickie Quilts
Just sew strips of fabric either horizontally or vertically to desired size. Add borders if desired. Complete as in option "A" above.
Holiday Charity Stocking
Click HERE for pdf instructions.
Stuffed Animal Toys
We collect stuffed animals for the holidays to be distributed to shelters, etc. for children. Use any fabric you have to make the animals. We will collect the stuffed and sewn animals at the November and December meetings only. We cannot store these stuffed toys in any of our homes, so we will collect them as close to the holidays as possible. Eyes, nose and mouth can be either drawn on with a Pentel Pen or embroidered on the animal. No buttons, doll eyes, doll noses, please. If you have a piece of fabric left over that will make a nice stuffed toy for a child, please go ahead and make it — some child will just love it.
To download patterns (in .pdf format), click on the icon or link:
 |
 |
 Bear1 |
 Bear2 |
 Happy / Sad |
 bunny |
 Small dinosaur |
 Small Seahorse |
 Large Seahorse |
 Cat |
 Horse |
 Duck |
 Dog 1 |
 Dog 2 |
Wheelchair bags
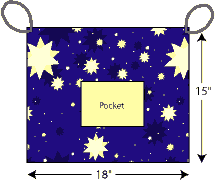
The finished size of the bag is 18" wide and 15" deep. A pocket on the outside is also a good idea. Use ½" seam allowance and double reinforcement. The handles finish to 6" (cut 12½"). Sew handles to the very edge of each side to hook onto the wheelchair handles. Any type of material can be used for this project. Material that is a little heavier would wear better. By doubling the length of the material, you will not have an extra seam.
›› Print These Instructions (PDF Format) ‹‹.
We also have patterns to print (in .pdf format) for wheelchair pockets and walker pockets. Select which instructions you wish to view:
Knitted and Crocheted Preemie Caps
Select which instructions you wish to download. The instructions are in .pdf format.
Drawstring Bags
Please print these Instructions (PDF Format)
Note: For Drawstring Bags and Stockings please use a HALF INCH seam allowance instead of a quarter inch seam allowance.
Pillowcases - Simple Burrito Method
Please print these Instructions (PDF Format)
Organizations Supported by Empire Quilters
Under Construction
Charity Coach and Chat
Charity Coach and Chat is now headed by Claire Surovell.
We meet at 11 am to plan and produce simple quilts for summer camps. Our aim with this group is to develop confidence and encourage camaraderie - and of course have some quilts for charity at the end of the year. All members are welcome.
We hope you join us while we work on the Scrappy Mountain Block You can find the pdf instructions by clicking HERE
The Service Committee is looking for members willing to demonstrate basic and intermediate techniques for making quilts, stuffed animals, or other items we donate to the many charitable organizations we support.
Long-standing members: Please email the Service Committee at info@empirequilters.net and let her know if you would like to help by attending one or more of these Charity Coach and Chat sessions or to answer questions from newer quilters. The sessions will be held from 11:00am to 1:00pm, before our regular meetings.
Newer quilters: Make your charity quilts with us! By coming to these Charity Coach and Chat sessions, you’ll learn all you need to know about making beautiful, useful charity quilts. During these sessions, you’ll learn how to plan, cut, sew, and finish your charity quilt. And we’ll also talk about making other items — like the holiday stockings and teddy bears.
The members who attended our monthly sessions this year not only learned how to make charity quilts, they picked up techniques they now use to make their own beautiful quilts.
This is open for all members and guests. We look forward to having a lively time with many people.
Updates coming soon.
Thank you Notes we received in late 2013/early 2014
Our Annual Charity Work Day: March 14, 2020
Do you want to help, but you're not sure how? Here are suggestions to get you started, and some great ideas of projects you can do over the summer.
Use these shortcuts to go directly to a specific section:
• Quilt Patterns • Stuffed Animal Patterns • Wheelchair Bags • Preemie Caps • Drawstring Bags • Pillowcases
• Organizations We Support • Other Charitable Opportunities •
Suggested Quilt Sizes (Approximate)
- Preemie Quilts — 16" x 24" quilted by hand or machine and washed in Ivory or Dreft. Absolutely NO tied quilts, no buttons, no pompoms.
- Crib Size — 36" x 36" – no larger than 45" x 45"
- Nursing Home (Wheelchair) — 36" x 36" No larger, please, as we do not want our beautiful quilts to get caught in the wheels.
- Summer Camp-minimum 60" wide, 80" long.
- Blankies, for pedriatic patients: 42" x 42" or larger, for ages newborn to 21 years.
- NICU Isolet Covers: 30" x 36" in light colored fabrics. Must be quilted, not tied.
Files in .pdf format require Adobe Acrobat Reader — a free program from Adobe. If you do not have Adobe Acrobat Reader, you can download it by clicking the Adobe Reader icon: ![]()
Easy Assembly Suggestions — Option A
Thank you to member Marge Geary for these easy assembly instructions:
On a large flat surface, layer (top to bottom): Batting, Top Fabric (right side down), Bottom Fabric (right side up). The right sides of your top and bottom fabric will be together. Sew around the border of three sides, and 3/4 of the way around the fourth side. Leave an opening and turn the quilt inside out. Your top layer will be in place, with the batting in the middle and the bottom layer on the bottom — just where they all belong! You are now ready to quilt or tie!

›› Print These Instructions (PDF Format) ‹‹.
Easy Assembly Suggestions — Option B
This is another way to finish off quilts rather than doing the pillow turn method or making separate binding and sewing on. This works up very fast for charity quilts.
This should be done with a machine with walking/even feed foot.
The top and batting should be the same size with the backing about 3" larger.
 Lay the backing face down with the top and batting centered on it, face up.
Quilt as desired.
Trim the backing to 1" all around.
Turn the backing in ½" to meet the top/batting.
Turn in again ½ to cover the edge of the top/batting.
Sew down on machine.
›› Print These Instructions (PDF format) ‹‹
Sample Quilt Patterns
Charity Quilt Pattern #1
Finishd block size is 7" and there are 30 blocks total, five rows of six each. Each row is the same, with rows 2 & 4 upside down.
 Start with a 6" square of a print fabric – 30 needed.
Cut 30 2" x 6" pieces of assorted solid or small prints.
Cut 30 2" x 7½" pieces of assorted solid or small prints.
Sew the smaller 2"x 6" border to the squares. PRESS to border.
Sew the 2"x 7½" to the square. PRESS to border.
Sew in rows of six alternating the side border right then left, border always on bottom. There are five rows. PRESS.
Sew rows together. PRESS.
To assemble, lay batting down smooth, lay backing on top, face up. Put top face down and pin baste around edges. Sew ¼" from edge of top all around leaving a 6" opening. Turn right side out and quilt by machine or tie. Close opening.
›› Print These Instructions (PDF format) ‹‹
Charity Quilt — Giant Log Cabin
 Start with a panel or large focal print measuring between 16"-22" x 22"-26" or two smaller panels with sashing in between.
You will want your finished quilt between 36-40" wide and 40-44" long. If your panel is 16"x24" you will need 10" each side to make 36" x 44"
36" – 16 = 20" / 2 = 10" ![]() 44" – 24" = 20" / 2 = 10"
44" – 24" = 20" / 2 = 10"
This 10" border for each side can be two 5" borders or three 3-4" borders. All strips can be different or same, 1 long or pieced.
This is like a giant log cabin block with the center the focal fabric.
If you have a serger, this is a good place to use it, as ¼" seam allowances do not have to be accurate.
Sew strips to each side, then top and bottom. Repeat. When finished, PRESS. It is just nine or 13 pieces and very fast.
To assemble, lay batting down smooth, lay backing on top, face up. Put top face down and pin baste around edgges. Sew ¼" from edge of top all around leaving a 6" opening. Turn right side out and quilt by machine or tie. Close opening.
›› Print These Instructions (in PDF Format) ‹‹.
Rag Quilt
These instructions are compliments of Elaine Jansen of Sewright in Bayside.
Thank you, Elaine!
 SUPPLIES:
- Sewing Machine
- Walking Foot
- Machine quilting needle size 90
- Thread: 40wt. Cotton (Mettler / YLI var.)
- Rotary cutter / ruler / mat
- Batting: cotton or thin poly
- Scissor (Fiskars softouch micro-tip recommended)
FABRICS: Yarn dyed woven cottons or cotton flannels work best (homespun, flannel, madras). WASH or NOT? If there is any question of color running — WASH!
YARDAGE:
- Baby Quilt: 30" x 36" (5 x 6); 30 pair (60 total) 7" squares = 3 yards
- Lap Quilt: 42" x 54" (7 x 9); 63 pair (126 total) 7" squares = 5½ yards
To calculate the amount of different fabrics needed, divide the total yardage by the number of fabrics — i.e. baby quilt: 3 divided 6 = ½ yard of 6 different fabrics.
BATTING:
- Baby: cut 30 6" squares
- Lap: cut 63 6" squares
 INSTRUCTIONS:
- Cut fabric into 7" squares
- Cut batting into 6" squares
- Sandwich batting between fabric
- Sew an "X" from corner to corner. This completes the block.
- Sew blocks together using a zig-zag stitch and a ½" seam, to desired size.
- When size is reached, in place of a binding, sew a zig-zag stitch ½" from raw edge around the entire quilt.
- Snip raw edges on seams and border 1/8" to ¼" apart.
- Take the completed quilt to the laundromat and wash and dry. It may take two washings to completely the edges to your sasisfaction.
›› Print These Instructions (in PDF Forma) ‹‹.
Easy Lee's Quickie Quilts
Just sew strips of fabric either horizontally or vertically to desired size. Add borders if desired. Complete as in option "A" above.
Holiday Charity Stocking
Click HERE for pdf instructions.
Stuffed Animal Toys
We collect stuffed animals for the holidays to be distributed to shelters, etc. for children. Use any fabric you have to make the animals. We will collect the stuffed and sewn animals at the November and December meetings only. We cannot store these stuffed toys in any of our homes, so we will collect them as close to the holidays as possible. Eyes, nose and mouth can be either drawn on with a Pentel Pen or embroidered on the animal. No buttons, doll eyes, doll noses, please. If you have a piece of fabric left over that will make a nice stuffed toy for a child, please go ahead and make it — some child will just love it.
To download patterns (in .pdf format), click on the icon or link:
 |
 |
 Bear1 |
 Bear2 |
 Happy / Sad |
 bunny |
 Small dinosaur |
 Small Seahorse |
 Large Seahorse |
 Cat |
 Horse |
 Duck |
 Dog 1 |
 Dog 2 |
Wheelchair bags

The finished size of the bag is 18" wide and 15" deep. A pocket on the outside is also a good idea. Use ½" seam allowance and double reinforcement. The handles finish to 6" (cut 12½"). Sew handles to the very edge of each side to hook onto the wheelchair handles. Any type of material can be used for this project. Material that is a little heavier would wear better. By doubling the length of the material, you will not have an extra seam.
›› Print These Instructions (PDF Format) ‹‹.
We also have patterns to print (in .pdf format) for wheelchair pockets and walker pockets. Select which instructions you wish to view:
Knitted and Crocheted Preemie Caps
Select which instructions you wish to download. The instructions are in .pdf format.
Drawstring Bags
Please print these Instructions (PDF Format)
Note: For Drawstring Bags and Stockings please use a HALF INCH seam allowance instead of a quarter inch seam allowance.
Pillowcases - Simple Burrito Method
Please print these Instructions (PDF Format)
Organizations Supported by Empire Quilters
Under Construction
Annual Service Reports
To see reports of service activities, and lists of donors for various years, see the following pages:
